Image resolution sounds technical, but most of the confusion comes from one simple problem: people use different words for different situations.
A designer may talk about DPI. A website owner may talk about pixels. A printer may ask for 300 DPI. A social media platform may recommend 1080 by 1080 pixels.
All of those things are related to image quality, but they do not mean the same thing.
If you are preparing images for a website, blog, online store, or social media post, pixels usually matter more than DPI. If you are preparing an image for print, DPI becomes more important.
Let’s make the difference clear.
What Is Image Resolution?
Image resolution describes how much visual detail an image has.
In everyday use, people usually talk about resolution in pixels. For example:
- 800 x 600 pixels
- 1200 x 800 pixels
- 1920 x 1080 pixels
- 4000 x 3000 pixels
The first number is the image width. The second number is the image height.
So an image that is 1920 x 1080 pixels is 1920 pixels wide and 1080 pixels tall.
More pixels usually mean the image can show more detail. But more pixels also make the file larger, especially if the image is saved at high quality.
That is why image resolution matters for website image optimization. You want enough pixels for the image to look clear, but not so many that the file becomes unnecessarily heavy.
What Are Pixels?
Pixels are the tiny squares that make up a digital image.
![]()
When you zoom in far enough, a photo is not one smooth object. It is made from many small color blocks. Those blocks are pixels.
A larger image has more pixels. A smaller image has fewer pixels.
For websites, pixels are the most important measurement because screens display images using pixels. If your website shows an image at 800 pixels wide, uploading a 5000-pixel-wide version is usually wasteful.
It may still look good, but the visitor’s browser has to load a much bigger file than needed.
If an image is too large for your layout, you can reduce its dimensions with an Online Image Resizer tool.
What Is DPI?
DPI stands for dots per inch.
It is mainly used for printing. DPI tells a printer how many dots of ink should fit into one inch of printed space.
A common print setting is 300 DPI because it creates sharp printed results for many documents, photos, and designs.
But here is the important part:
DPI does not matter much for normal website images.
A browser mostly cares about the image’s pixel dimensions, not the DPI value saved inside the file.
For example, a 1200 x 800 image at 72 DPI and a 1200 x 800 image at 300 DPI will usually appear the same size on a website if the pixel dimensions are the same.
That is where many beginners get confused. They see 72 DPI or 300 DPI and assume it controls web quality. For the web, the pixel size is what matters most.
DPI vs Pixels: The Simple Difference
Pixels describe the digital size of the image.
DPI describes how densely the image should be printed.
| Term | What it means | Most important for | Example |
|---|---|---|---|
| Pixels | Digital width and height of an image | Websites, screens, social media, apps | 1200 x 800 pixels |
| DPI | Print density, or dots per inch | Printed photos, posters, documents | 300 DPI |
| File size | How heavy the image file is | Website speed and storage | 250 KB or 3 MB |
| Display size | How large the image appears on screen | Web layout and user experience | 600px wide in a blog post |
If you are working on a website, start by thinking in pixels.
If you are preparing something for print, ask about DPI.
Does Higher Resolution Always Mean Better Quality?
Not always.
Higher resolution can give an image more detail, but it does not automatically make the image better.
A blurry photo will still look blurry if you make it larger. A low-quality image will not magically become sharp just because the dimensions increase.
Higher resolution also creates larger files. That can slow down a website if the image is much bigger than needed.
For example, a homepage banner might only need to display at 1600 pixels wide. Uploading a 6000-pixel-wide photo may add extra weight without giving visitors a visible benefit.
The better goal is not “use the highest resolution possible.”
The better goal is:
Use the right resolution for where the image will appear.
What Resolution Is Best for Website Images?
There is no single perfect image resolution for every website.
It depends on where the image is used.
A small thumbnail does not need the same size as a full-width banner. A product image may need more detail than a small icon. A blog cover image may need to look sharp on both desktop and mobile.
Here are practical starting points:
| Image type | Common useful size |
|---|---|
| Blog cover image | 1200 to 1600 pixels wide |
| Website banner | 1600 to 2400 pixels wide |
| Product image | 1000 to 2000 pixels wide |
| Thumbnail | 300 to 600 pixels wide |
| Social media square image | 1080 x 1080 pixels |
| Small icon or UI image | 64 to 512 pixels wide |
These are not strict rules. They are starting points.
The safest approach is to check how large the image actually appears on your page, then resize it close to that size. This keeps the image clear without making the file heavier than needed.
Why Oversized Images Slow Down Websites
Oversized images are one of the most common reasons websites feel slow.
If your page displays an image at 800 pixels wide, but the uploaded file is 4000 pixels wide, the browser still has to download the larger image unless your website creates smaller versions automatically.
That means:
- More data to download
- Slower loading on mobile
- More bandwidth usage
- Heavier pages
- Poorer user experience
This is why image resolution and file size work together.
You can have the right format, good compression, and a modern image format like WebP, but if the image dimensions are far too large, the file may still be heavier than necessary.
Resize first. Then compress. Then upload.
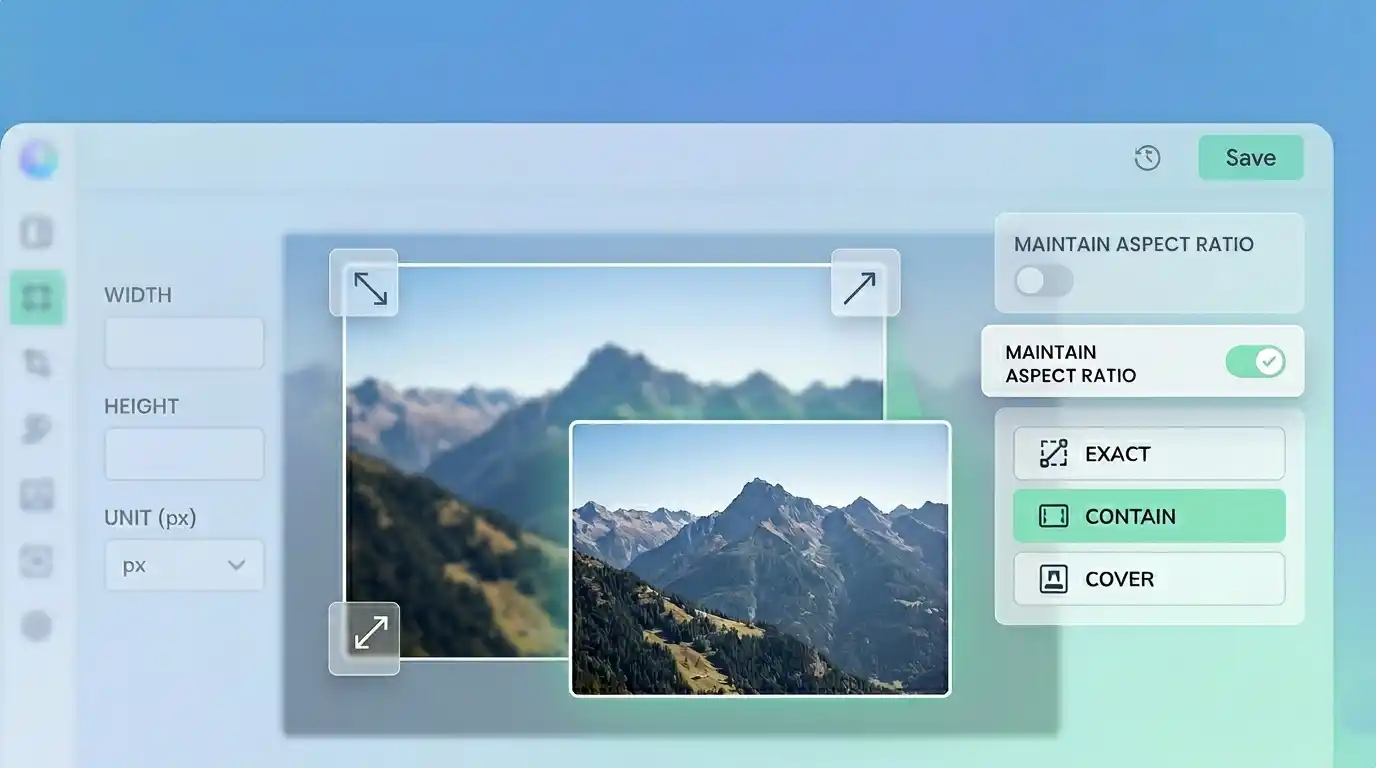
How to Resize Images Without Losing Practical Quality
Resizing means changing the pixel dimensions of an image.
For example, you might resize:
- 4000 x 3000 pixels to 1600 x 1200 pixels
- 3000 x 2000 pixels to 1200 x 800 pixels
- 2000 x 2000 pixels to 1080 x 1080 pixels
This does not mean ruining the image. It means making the image match its real use.
If the image will only appear inside a blog post, it probably does not need to be the full size from your camera or phone.
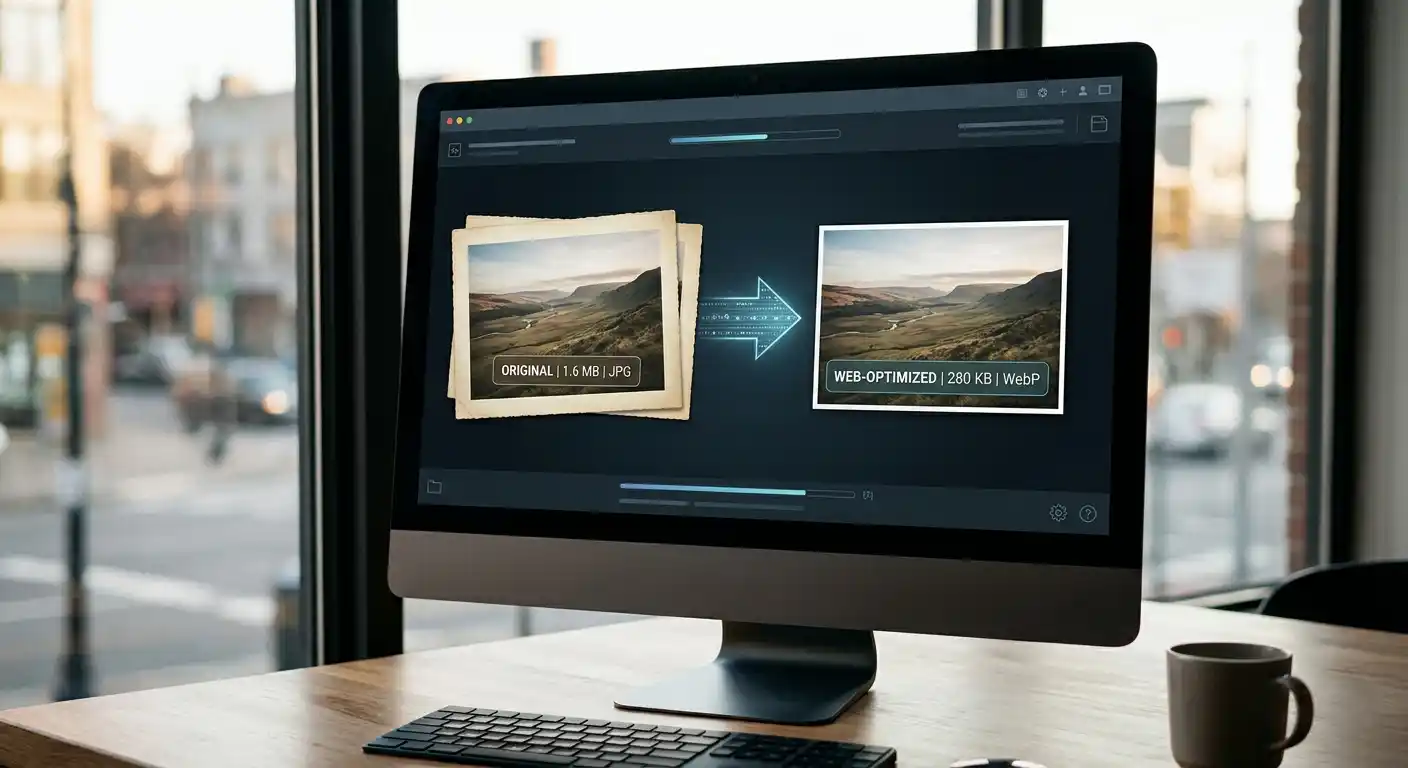
You can use the SolutionBazz Image Resizer to reduce oversized dimensions before uploading images to your website.
After resizing, use the SolutionBazz Image Compressor to make the file lighter while keeping the image visually clear:
This simple workflow helps create faster loading images without making the process complicated.
DPI for Web Images: Should You Care?
For most web images, no.
If you are uploading an image to a website, blog, or social media platform, focus on:
- Pixel width and height
- File size
- Image format
- Visual clarity
- Compression quality
The DPI value inside the image file usually does not change how the image looks on a normal web page.
A 1200 x 800 image is still 1200 x 800 pixels whether the file says 72 DPI, 96 DPI, or 300 DPI.
That does not mean DPI is fake. It matters in print workflows. It just is not the main thing to worry about for website images.
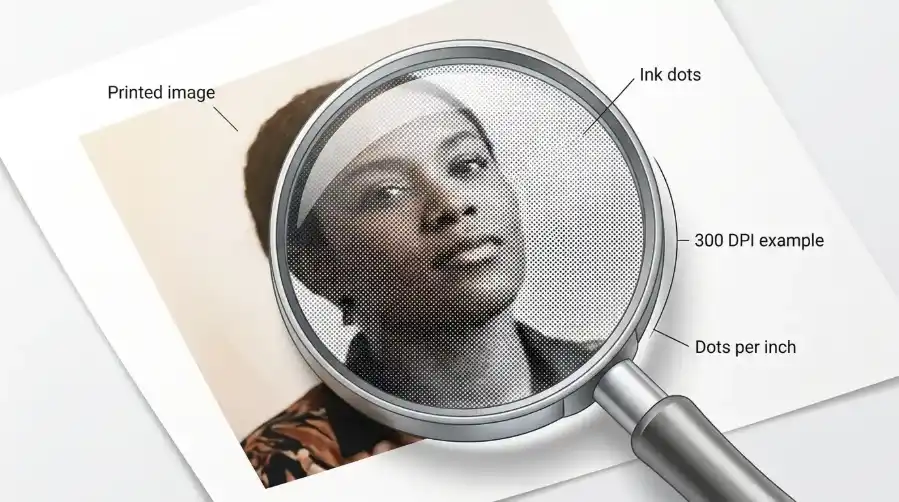
DPI for Print Images: When It Matters
DPI matters when an image will be printed.
If you want to print a photo, flyer, poster, or business card, the image needs enough pixels for the physical print size.
For example, printing an image at 300 DPI means the printer uses 300 dots per inch.
A 6-inch-wide print at 300 DPI needs about 1800 pixels across.
That is why an image that looks fine on a phone screen may look soft or pixelated when printed large. The image may not have enough pixels for the physical size you want.
So the rule is simple:
For websites, think in pixels.
For print, think in inches and DPI.
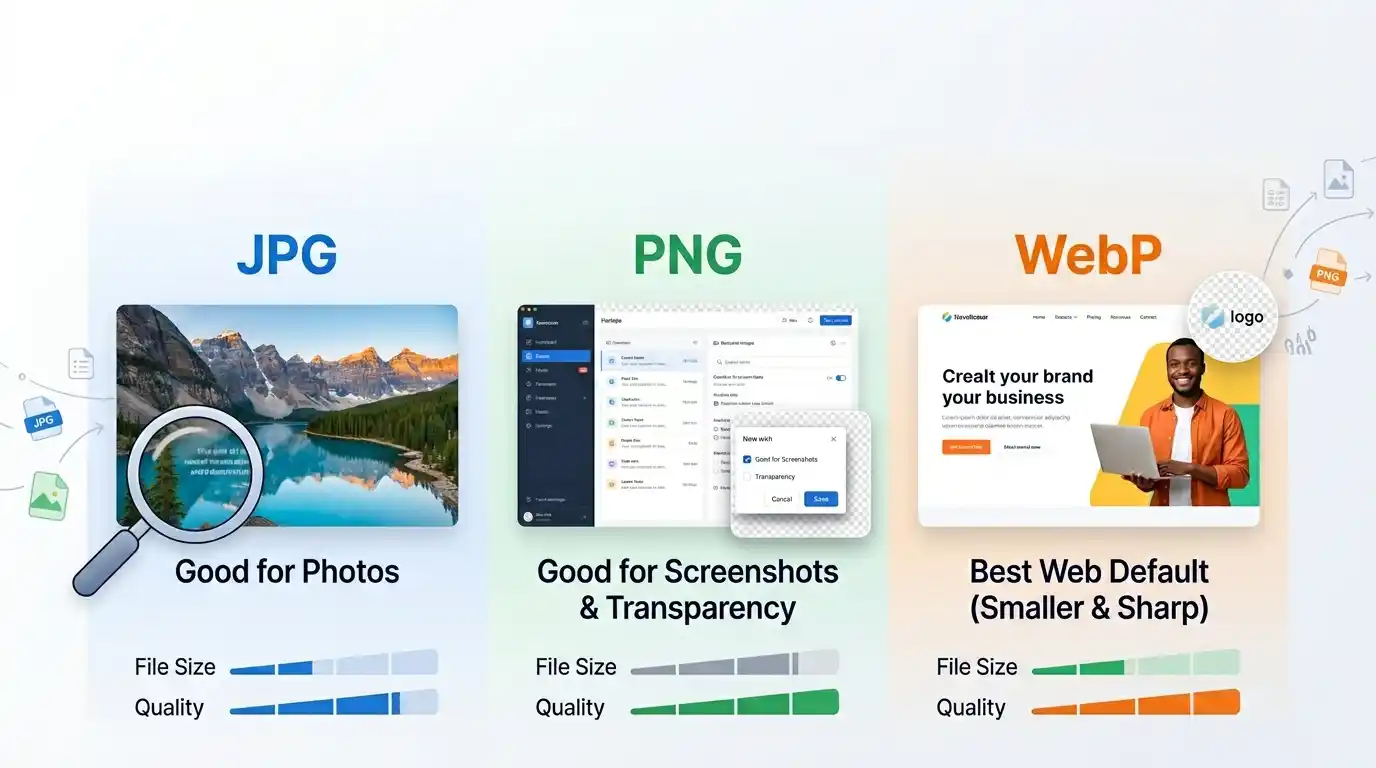
Image Resolution and File Format
Resolution is only one part of image optimization.
The file format also matters.
JPG is common for photos. PNG is useful for transparency and sharp graphics. WebP is a modern image format that often creates smaller image files for websites.
If you are preparing images for the web, you may resize the image first, compress it, then convert it to WebP for faster loading.
For example:
- Use JPG for regular photos when compatibility matters
- Use PNG when you need transparency
- Use WebP when you want smaller files for website performance
If your image is already in JPG format, you can use the JPG to WebP Converter to create a lighter WebP version:
If your image is a PNG, especially one with transparency, use the PNG to WebP Converter to reduce file size while keeping transparency:
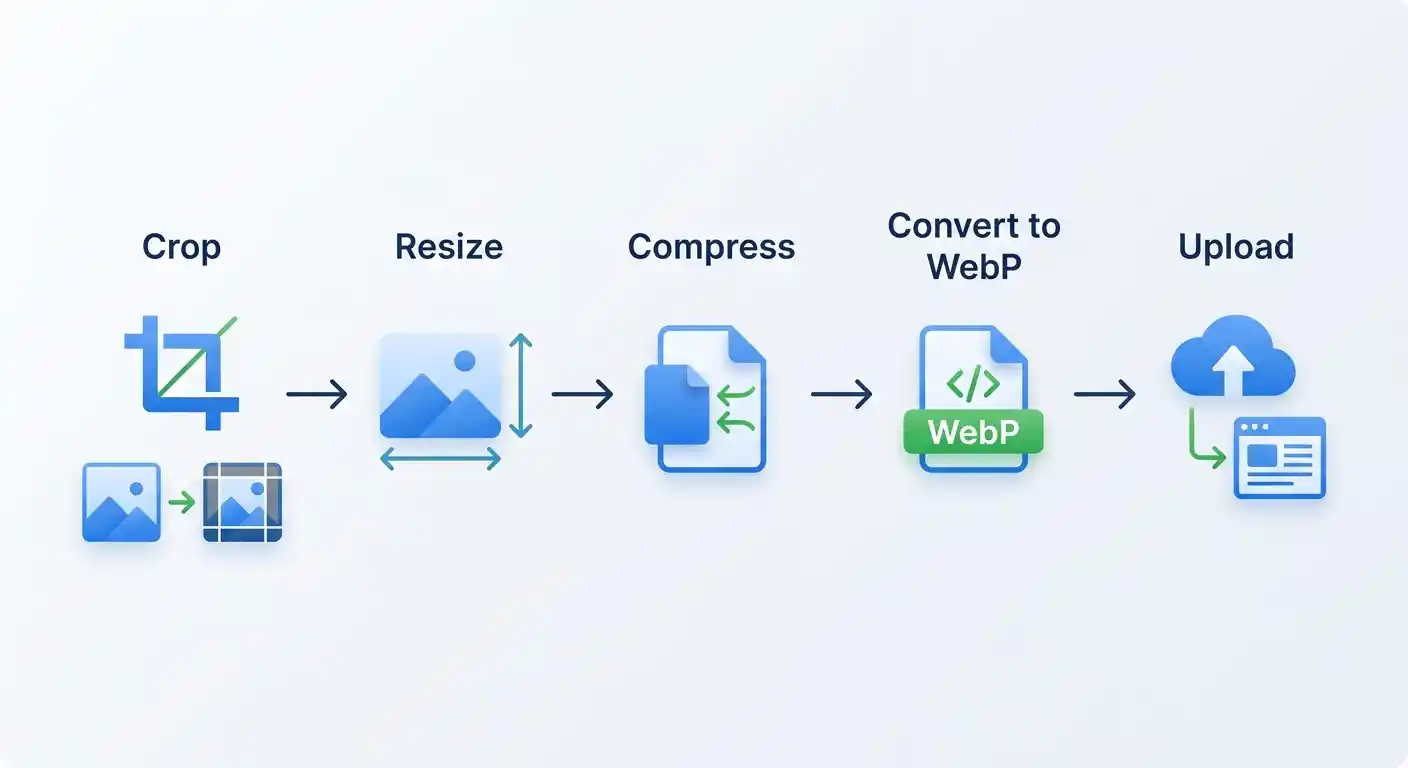
A Simple Web Image Workflow
You do not need to overthink every image.
For most website images, this workflow is enough:
- Choose the image you want to use.
- Crop it if the framing is wrong.
- Resize it to the dimensions your page actually needs.
- Compress the image to reduce file size.
- Convert it to WebP if it is useful for faster loading.
- Upload it and check how it looks on desktop and mobile.
If the image has too much empty space or the subject is too far away, crop it first with the Image Cropper.
Then resize and compress.
This keeps the final image cleaner, lighter, and easier to use.
Common Mistakes to Avoid
A few image resolution mistakes happen again and again.
Uploading full camera photos directly to a website is one of the biggest. Phone and camera images can be thousands of pixels wide, which is often much larger than needed.
Another mistake is increasing image dimensions and expecting better quality. Making a small image larger usually makes it look blurry because the missing detail is not really there.
Some people also worry too much about 300 DPI for web images. For websites, pixel dimensions and file size matter more.
The last mistake is compressing an image too much. Smaller file size is good, but the image still needs to look clean and usable.
FAQ
What is image resolution?
Image resolution is the amount of detail in an image. For digital images, it usually means the width and height in pixels, such as 1200 x 800 pixels.
Is DPI the same as pixels?
No. Pixels describe the digital size of an image. DPI describes print density, or how many dots are printed per inch.
Does DPI matter for websites?
Not much. Websites mainly use pixel dimensions. A browser cares more about how many pixels wide and tall the image is than whether the file says 72 DPI or 300 DPI.
What resolution should I use for web images?
Use the size your website actually needs. Blog images often work well around 1200 to 1600 pixels wide, while thumbnails can be much smaller.
Can I make a low-resolution image high quality?
Not really. You can increase its dimensions, but that does not add real detail. It is better to start with a clear image and resize it down when needed.
Final Thoughts
Image resolution becomes much easier once you separate DPI from pixels.
Pixels matter most for websites, screens, blogs, online stores, and social media. DPI matters most when you are printing.
For website image optimization, focus on the practical things: use the right pixel dimensions, reduce oversized images, compress files before upload, and choose a suitable format.
A good image does not need to be huge. It needs to be clear at the size where people actually see it.
Start there, and your images will look better, load faster, and feel much easier to manage.