You usually notice image compression only when it has been ignored.
A page feels heavier than it should. A blog post takes too long to settle. Product images look fine once they finally load, but the whole experience feels slower than the rest of the site. In many cases, the problem is not the number of images. It is the size of them.
That is where image compression comes in.
Image compression is the process of reducing the file size of an image so it loads faster and uses less storage, without ruining the visual result. For beginners, that is the most important definition to understand. You are not trying to destroy quality. You are trying to keep the image useful while removing extra weight.
If your website uses banners, blog graphics, screenshots, product photos, or featured images, this matters more than it first appears.
Quick summary
- Image compression makes image files smaller.
- Smaller images usually load faster on websites.
- Good compression keeps visual quality at an acceptable level.
- Lossless compression preserves image data more carefully.
- Lossy compression removes some data to get a much smaller file.
- Compression is not the same thing as resizing.
- Most website images should be resized and compressed before upload.
Why image compression matters on a website
Images are often the heaviest part of a page.
Text is lightweight. Code and styling can add size too, but large image files are one of the most common reasons a page becomes slow, especially on mobile. A modern camera photo or a high-quality export from a design tool can be far larger than what a website actually needs.
When those files are uploaded without preparation, the browser has to download all of that extra weight. The result is predictable:
- pages take longer to load
- mobile users feel the delay more sharply
- bandwidth usage increases
- the site feels less responsive
- scaling content becomes harder over time
This is why image compression is not just a technical detail for developers. It is part of publishing well.
A fast website tends to feel more trustworthy and easier to use. Compression helps you get closer to that without changing the design or removing visuals.
What image compression actually does
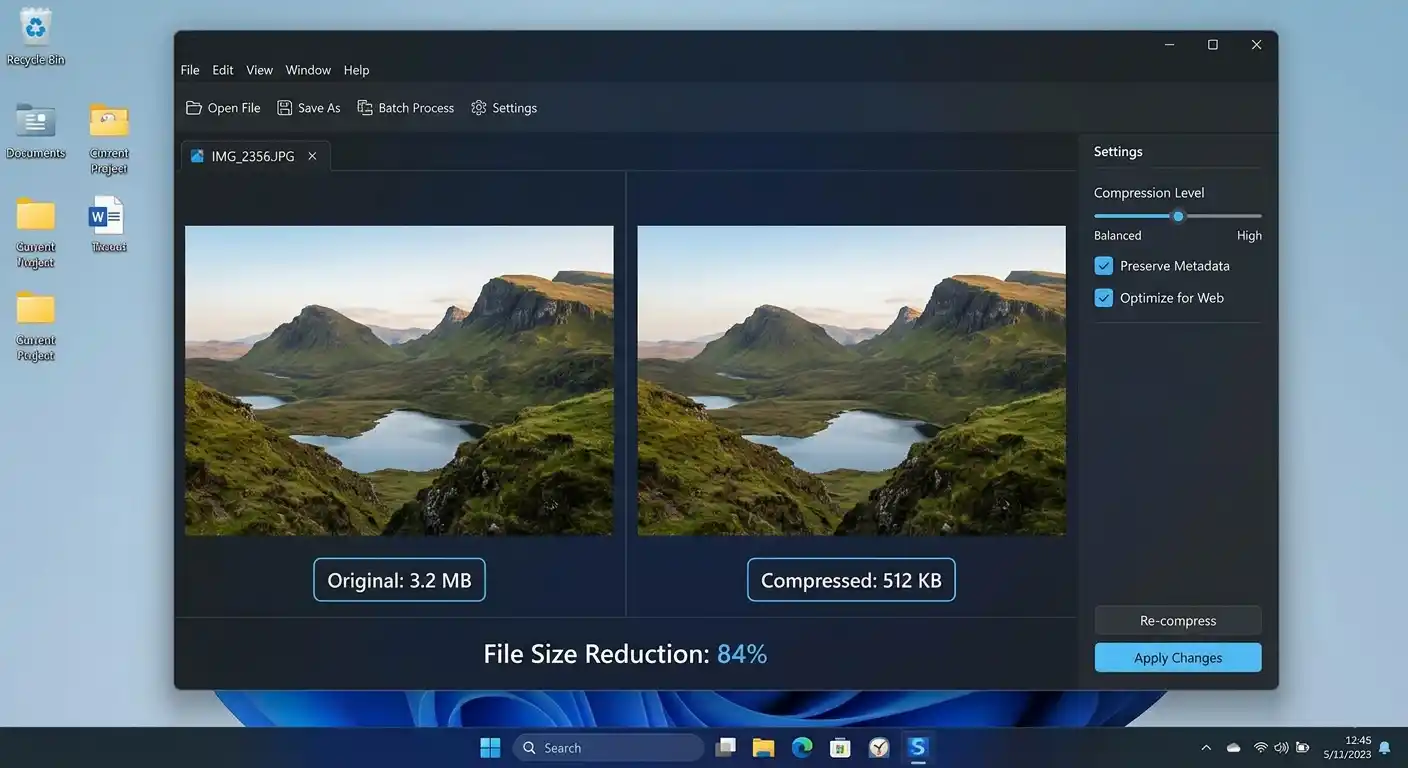
Every image file contains data. Compression reduces how much data is needed to store or deliver that image.
Sometimes that reduction happens by organizing data more efficiently. Sometimes it happens by removing details that are less noticeable to the human eye. Either way, the result is a smaller file.
That means a 3 MB image might become 900 KB, 500 KB, or even smaller, depending on the format, content, and compression level.
The key idea is this: image compression is a balance between file size and visual quality.
A well-compressed image still looks clean in normal use. A badly compressed image starts to show damage. You may see blur, harsh artifacts, broken gradients, or mushy details. So the goal is not maximum reduction at any cost. The goal is efficient reduction that still looks appropriate on the page.
The two main types of compression
The simplest technical distinction beginners should know is lossless versus lossy compression.
Lossless compression
Lossless compression reduces file size without permanently removing image data in a way that harms the original visual integrity. It is a safer approach when you want to preserve detail more carefully.
It is often useful for:
- logos
- interface graphics
- diagrams
- images that may need editing later
- files where sharp edges matter
Lossless compression is valuable, but it usually does not shrink files as dramatically as lossy methods.
Lossy compression
Lossy compression removes some image data to achieve a much smaller file size. That sounds worse than it is. In practice, lossy compression is extremely common and often the right choice for web images, especially photos.
Used well, it reduces file size significantly while keeping the image visually acceptable for normal viewing.
It is often useful for:
- photographs
- blog images
- banners
- product photos
- content where fast loading matters more than perfect preservation
The danger is overdoing it. Too much lossy compression can make an image look visibly degraded.
Compression types at a glance
| Type | File Size Reduction | Quality Impact | Best For |
|---|---|---|---|
| Lossless | Moderate | Minimal visible change | Logos, graphics, editable assets |
| Lossy | Strong | Slight to noticeable depending on settings | Photos, banners, web images |
This is not a rule that covers every case, but it gives beginners a reliable starting point.
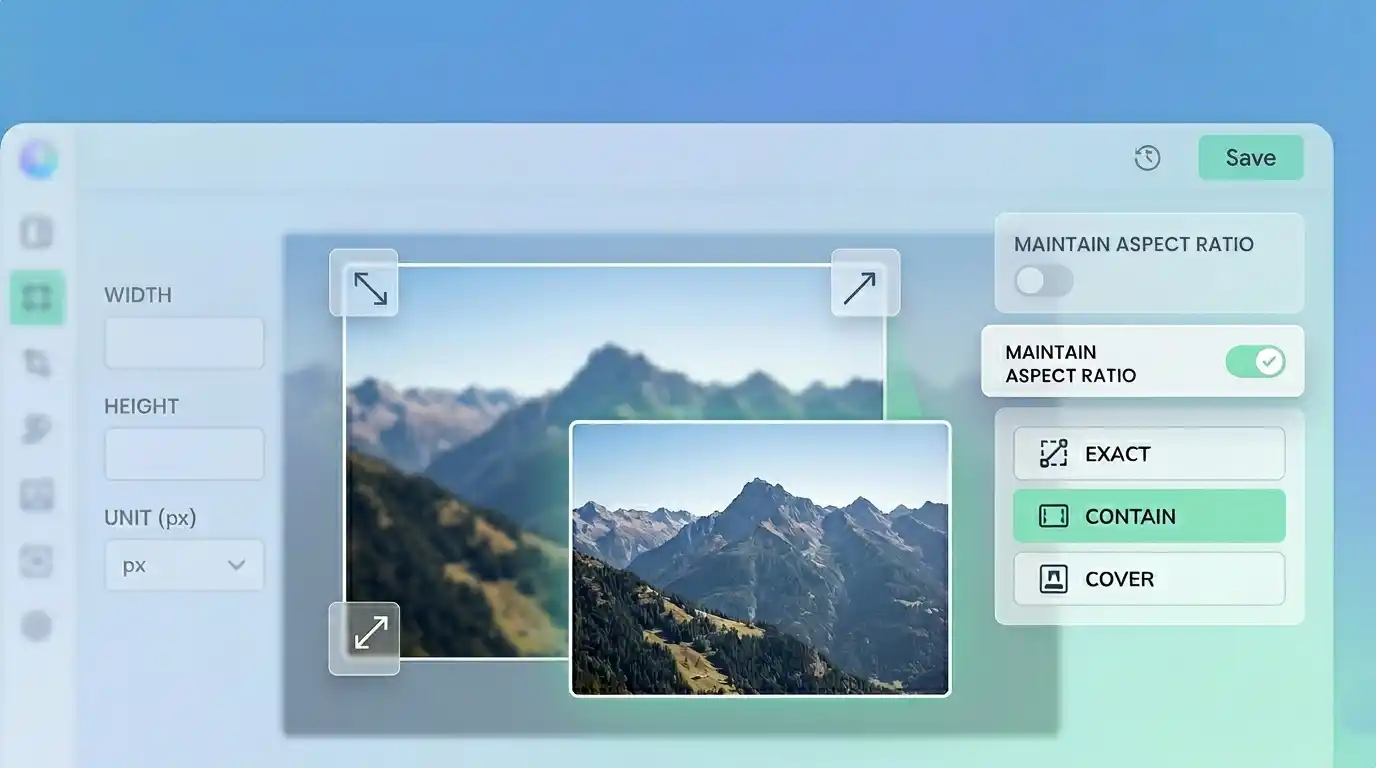
Compression is not the same as resizing
This is one of the most common points of confusion.
People often think compression and resizing are interchangeable, but they solve different problems.
Resizing changes the image dimensions, such as reducing an image from 4000 pixels wide to 1200 pixels wide.
Compression changes how much data is stored in the file.
You often need both.
If your article image is displayed at 1200 pixels wide, uploading a 4000-pixel original is usually unnecessary. Resizing reduces the dimensions to something more sensible. Compression then reduces the weight of that resized file even further.
That is why image optimization usually works best as a workflow rather than a single adjustment.
A simple comparison
| Task | What It Changes | Why It Helps |
|---|---|---|
| Resize | Width and height | Prevents uploading unnecessarily large dimensions |
| Compress | File data and weight | Helps the image load faster and use less storage |
A lot of oversized images happen because only one of these steps was done.
Why compression affects performance and SEO
Image compression is mainly a performance improvement, but performance has wider consequences.
A lighter page tends to feel faster. A faster page is easier to browse. That can improve how long users stay on the site and how smooth the experience feels on weaker connections or smaller devices.
Compression also supports cleaner long-term site health. If your content library keeps growing, unoptimized images can quietly accumulate into a larger performance problem.
This matters for:
- blogs with many posts
- e-commerce sites with product galleries
- portfolios with visual work
- tutorials that rely on screenshots
- landing pages with large banners
Compression alone will not solve every SEO issue, but it supports the broader goal of faster, more usable pages. That is worth treating seriously.
Which images should usually be compressed?
Almost every image prepared for the web should be compressed in some form.
That includes:
- featured images
- article visuals
- hero images
- product photos
- team photos
- screenshots
- gallery images
- portfolio previews
The real decision is not whether to compress. It is how aggressively to compress each image.
A large decorative background image can often handle more compression than a screenshot containing small text. A product image may need cleaner detail than a casual blog visual. A transparent graphic may need a different format and approach from a photo.
So compression decisions should follow the purpose of the image.
What over-compression looks like
The beginner mistake is easy to make: smaller files feel like progress, so people keep reducing quality until the image starts to look damaged.
Common signs of too much compression include:
- blurry edges
- blocky textures
- halos around shapes
- muddy shadows
- banding in gradients
- text inside the image becoming hard to read
- faces or objects losing natural detail
When these flaws are visible during normal viewing, the compression has probably gone too far.
The right target is not the smallest possible file. It is the smallest file that still looks clean enough for real users.
Common mistakes
- Uploading images directly from a camera or phone without resizing them first
- Using the same format for every image regardless of content
- Assuming a visually small image on the page must also have a small file size
- Compressing too aggressively just to chase lower numbers
- Ignoring screenshots and blog graphics while only optimizing photos
- Treating image optimization as cleanup instead of part of the publishing process
None of these are unusual. They are just habits worth fixing early.
File format and compression work together
Compression results depend partly on the file format.
A beginner does not need a deep technical breakdown here, but it helps to know the practical role of common formats.
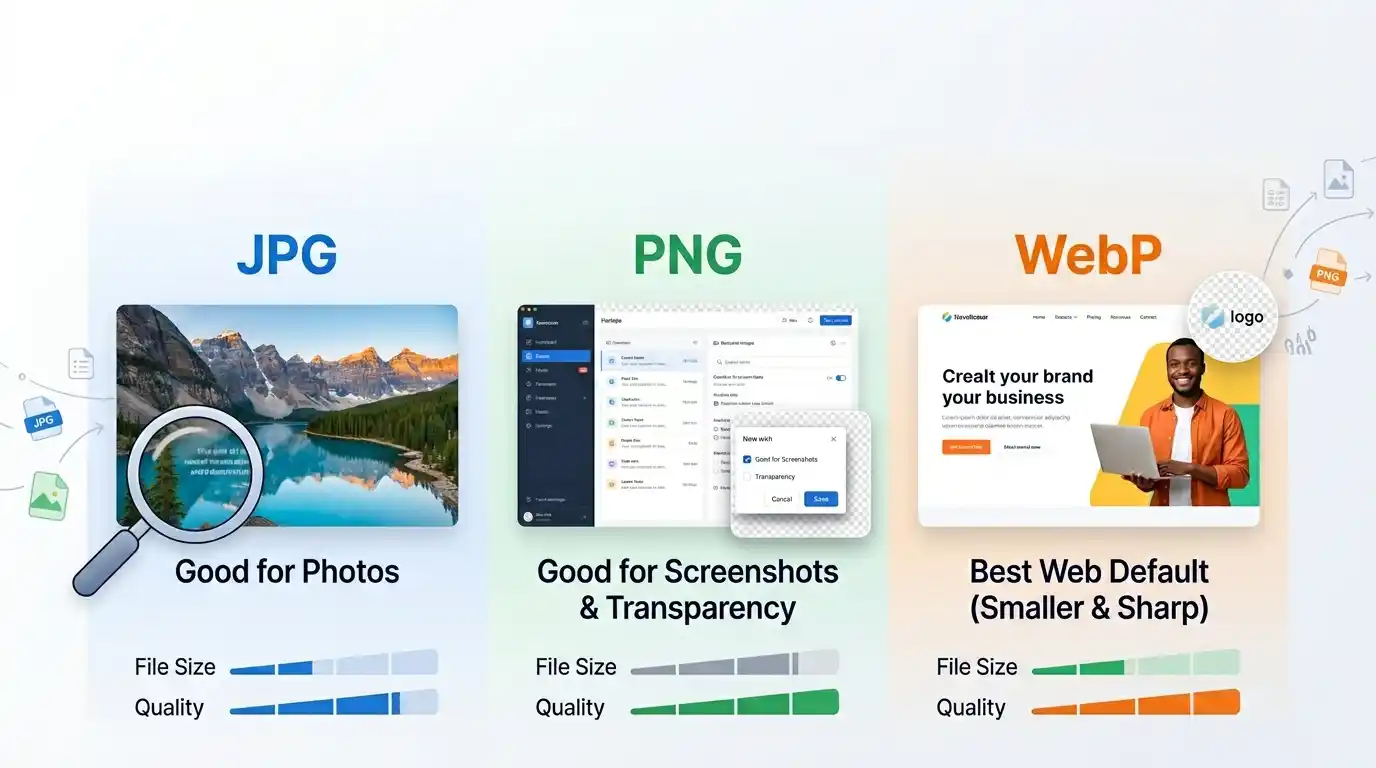
| Format | Best Use | Compression Style | Notes |
|---|---|---|---|
| JPG/JPEG | Photos and complex visuals | Usually lossy | Common and efficient for photographs |
| PNG | Graphics, transparency, sharp edges | Often lossless | Can become large for photos |
| WebP | Web images of many kinds | Lossy or lossless | Often gives strong size savings for websites |
This is one of the reasons image optimization is rarely just a one-click decision. The best result often comes from choosing the right format first, then applying compression appropriately.
A practical workflow for beginners
If you want a simple repeatable process, use this:
- Decide where the image will appear.
- Resize the image to realistic dimensions for that placement.
- Choose the most suitable format.
- Compress the image for web use while keeping quality acceptable.
- Check the result visually before publishing.
That is enough to avoid most common problems.
If your site includes a tool like an Image Resizer, this is a natural place to link it. Resizing before compression is often the step that makes the rest of the process easier and more effective.
Checklist before uploading an image
- Is the image larger than the page actually needs?
- Is the format suitable for the image type?
- Has the file been compressed for web use?
- Does it still look clean at normal viewing size?
- Would it load reasonably on mobile?
A short check like this prevents a lot of slow pages later.
Final takeaway
Image compression is the process of making image files smaller so they load faster, use less bandwidth, and take up less storage without becoming visually unusable.
For beginners, the most useful thing to remember is that compression is about balance. Not every image needs the same treatment. Some need careful quality preservation. Others can be compressed more aggressively without any real downside.
Once you understand the difference between lossless and lossy, and once you stop confusing compression with resizing, the whole topic becomes much easier to manage. From there, it turns into a simple publishing habit: prepare the image properly before it goes live.
That habit pays off across every page you build.
Try the tool
Compress images without leaving your browser
Reduce image file size for JPG, PNG, and WebP files in a few clicks. Preview the result, keep quality under control, and make images lighter for the web. Your files stay on your device, so the process stays private and fast.
Open Image Compressor